
What if your laptop could become a tiny web-hosting laboratory—without turning your everyday computer into a science experiment? This VirtualBox Kali Linux Docker tutorial shows you how to build that lab, one small mission at a time.
Picture this: you open a browser, type an address, and a website appears. Nice. Then you open a second address, and another website appears. Both are running on your computer. Neither needed a traditional web-server installation. And when you’re finished, you can switch the whole laboratory off.
No expensive server. No mysterious data center. No wizard hat required. 🧙
That’s what we’re building today: a beginner-friendly development playground using VirtualBox, Kali Linux, and Docker. We’ll start with a virtual computer, install Docker inside it, and launch two independent Nginx web servers. We’ll even give one of them a personality.
Our promise: these aren’t imaginary commands copied from a manual. We worked through this experiment ourselves using a Kali Linux 2026.3 prebuilt VirtualBox machine. You’ll see what we tested, what each command does, and where the boundaries of our experiment are.
Meet the three characters in our little tech adventure
Before we press any buttons, meet the team. If you’re just starting your tech journey, our guide to essential digital skills for students explains why hands-on practice matters.
- VirtualBox — the apartment building. It lets your computer host a separate virtual computer, with its own operating system and settings.
- Kali Linux — our apartment. It’s the Linux operating system inside that virtual machine. We’re using Kali because we also want to explore cybersecurity tools in future lessons.
- Docker — the clever room organizer. It runs applications in containers, so our web servers can have their own spaces without each needing an entire operating system.
That comparison isn’t perfect—containers share the Linux kernel of their Docker host, while a virtual machine runs a separate guest operating system—but it’s a useful mental picture. And no, Docker doesn’t require Kali: other supported Linux distributions work too.
Mission 0: Prepare your VirtualBox Kali Linux Docker lab
You’ll need a computer with virtualization support, internet access, free disk space, and enough memory to comfortably run a virtual machine. For our experiment, we configured Kali with 4 GB RAM, 2 virtual CPUs, and NAT networking. The prebuilt VM had an approximately 80 GB virtual disk. These are our settings, not a universal minimum.
Hardware compatibility: This walkthrough uses standard Intel/AMD x86_64 hardware. Apple Silicon Macs use ARM-based processors and require an ARM-compatible setup; don’t follow these VirtualBox and Kali VM steps unchanged.
Virtualization setting: If VirtualBox reports that hardware virtualization is unavailable, you may need to enable Intel VT-x or AMD-V (sometimes called SVM Mode) in your computer’s BIOS/UEFI settings. Many computers already have it enabled. The setting’s name and location vary by manufacturer, so consult your device’s official documentation before changing firmware settings.
Our downloads come from official sources. Use these direct links rather than relying on search ads or third-party download sites:
- Oracle VirtualBox — official project website (follow its Downloads link)
- Kali Linux downloads — choose the prebuilt Virtual Machines → VirtualBox image appropriate for your computer
- Kali’s guide to importing the prebuilt VM
- Kali: Install Docker — official instructions (we will use these in Mission 2)
Download from the official sites and check the Kali archive’s published checksum for your exact version. It takes a little extra effort, but learning good download habits early is a superpower.
Mission 1: Build a computer inside your computer
First, install VirtualBox using Oracle’s installer from the official VirtualBox downloads page. Launch VirtualBox Manager when you’re done.
Next, download Kali’s prebuilt VirtualBox archive and extract the .7z file. In VirtualBox Manager, choose Add (or the option for adding an existing virtual machine), find the extracted .vbox file, and open it.
Review the VM settings. We used 4 GB RAM, 2 CPUs, and the default-style NAT network connection. Start the machine.
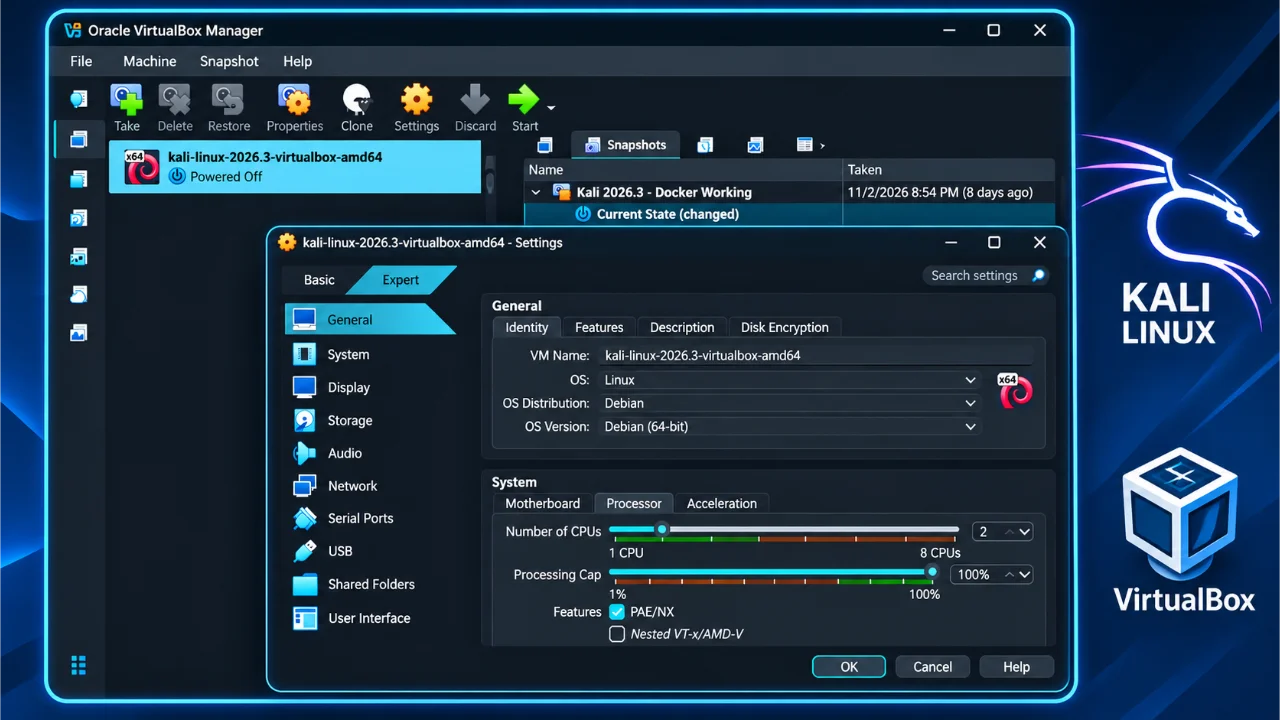
Plot twist: you now have a Linux computer running inside your regular computer. It has its own desktop, terminal, and browser. That’s virtualization in action.
Kali’s prebuilt virtual machine commonly ships with the documented default login kali / kali. Change that password before exposing the VM to other networks or using it for network-facing activities. NAT is convenient for this local lab, but it’s not a magical security shield.
Open Firefox inside Kali and visit a website. If it loads, your virtual laboratory has internet access. First mission complete.
Mission 2: Install Docker in Kali Linux
Open Kali’s terminal. It may look intimidating, but for now it’s simply a place where we give the computer precise instructions. Run these commands one at a time:
sudo apt update
sudo apt install -y docker.io
sudo systemctl enable --now docker
Translation from computer-speak: update the package list; install Docker Engine from Kali’s repositories; start Docker and enable its service for future boots.
Why docker.io? Because that’s the package name used for Docker Engine in Kali’s repository. We’re not accidentally installing the internet. 😄
Check that Docker is there:
sudo docker --version
sudo systemctl status docker
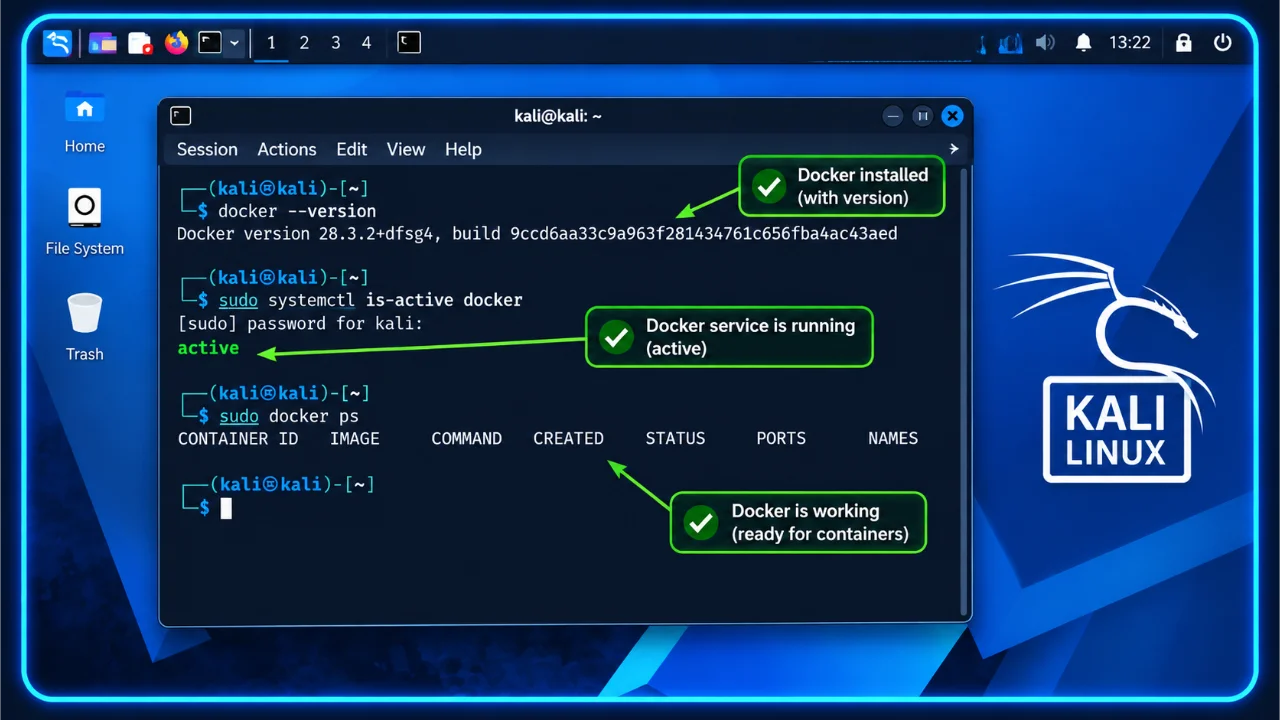
You should see Docker version information and a running service. If the status screen doesn’t return to the prompt, press q. For a simpler one-word service check, run sudo systemctl is-active docker (the result should be active), then use sudo docker ps to verify Docker responds. These are the checks shown in our annotated screenshot.
We intentionally use sudo throughout. Giving a normal user unrestricted access to the Docker daemon through the docker group is effectively giving them root-level privileges, as Docker’s official Linux post-installation guide explains. It’s not something beginners need to do just to follow this tutorial.
Mission 3: Say hello to your first container
Time for a tiny victory. Type:
sudo docker run hello-worldDocker downloads the small test image if necessary, creates a container, runs it, prints a message, and exits.
Look for the words “Hello from Docker!”. If you see them, congratulations: you’ve run your first container.
Here’s an important distinction you’ll use again and again: an image is the reusable blueprint; a container is an instance created from it. Think cookie cutter versus cookie. Except these cookies can run software. Please don’t eat them.
Mission 4: Launch your first Docker web server on Kali Linux
Now we move from a friendly greeting to something you can actually see in a browser. Run:
sudo docker run -d --name my-first-webserver -p 127.0.0.1:8080:80 nginx:alpineLet’s decode that:
runcreates and starts a container.-druns it in the background.--name my-first-webservergives it a memorable name.-p 127.0.0.1:8080:80maps Kali’s local port 8080 to port 80 inside the container.nginx:alpineis the lightweight Nginx image.
Open Firefox inside Kali and enter http://localhost:8080.
Ta-da! The familiar Welcome to nginx! page should appear. You’ve just launched a real web server from a container image. No separate Nginx installation on Kali required.
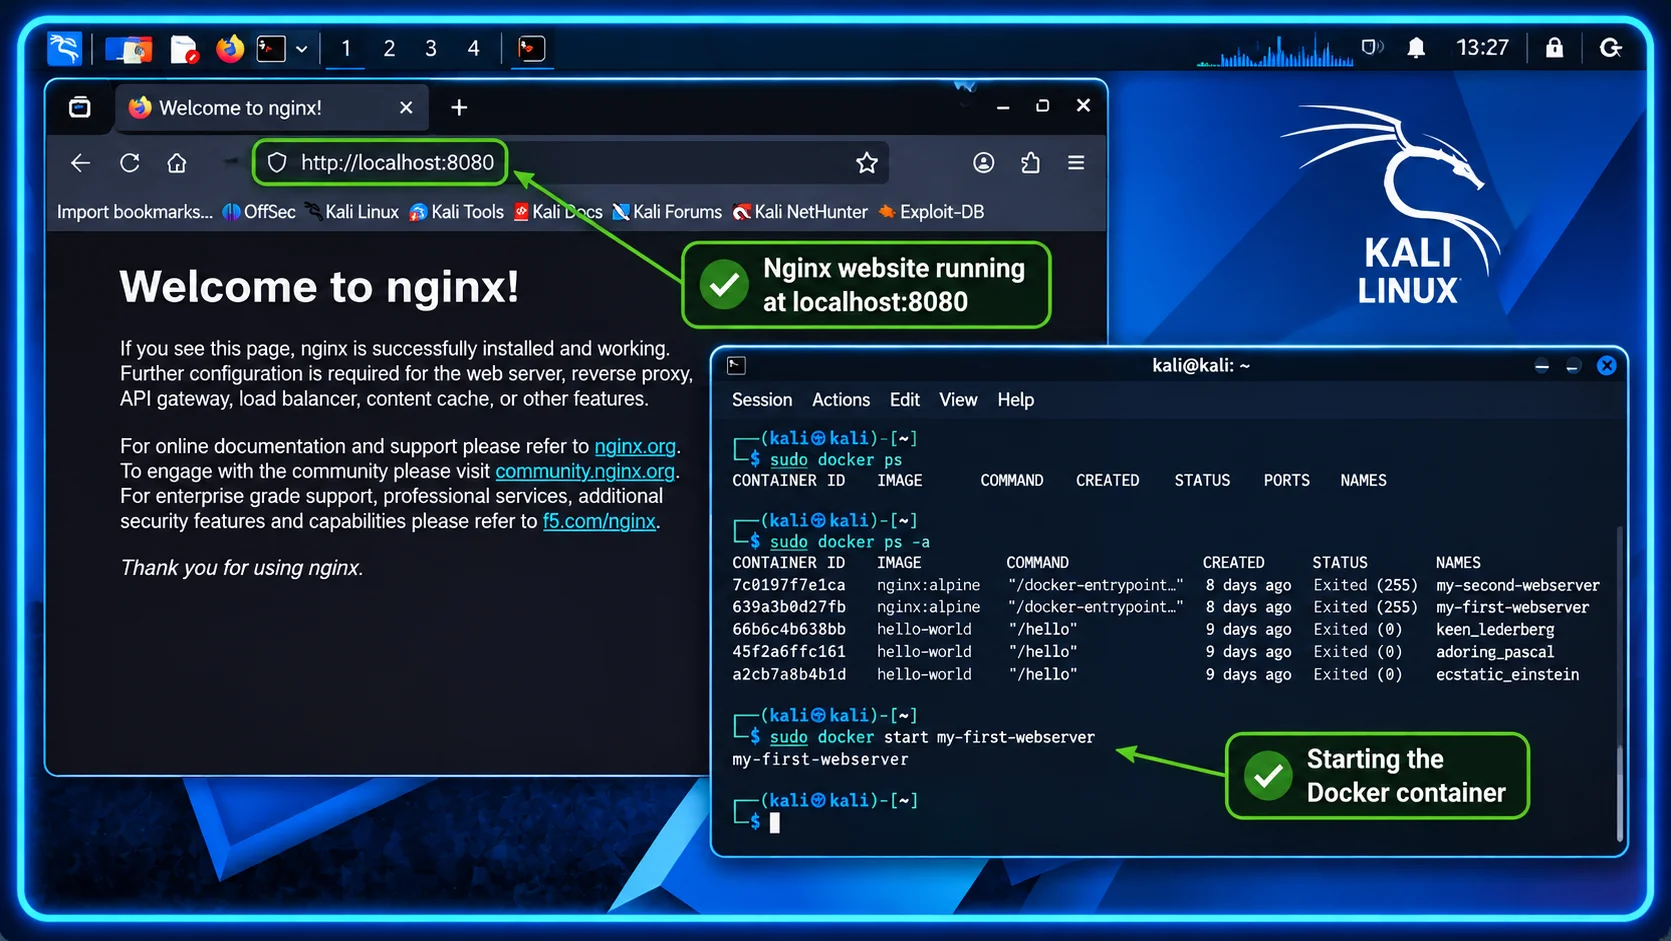
Small safety improvement: during our original experiment we used -p 8080:80. This article uses 127.0.0.1:8080:80 so the port is bound only to Kali’s loopback interface. Both approaches demonstrate port mapping, but the latter is a better default for a local beginner lab.
Curious what Docker is running? Ask it:
sudo docker psFor both running and stopped containers, use:
sudo docker ps -aMission 5: The disappearing website trick
Let’s perform a tiny magic trick. Stop your web server:
sudo docker stop my-first-webserverRefresh http://localhost:8080. The page should stop loading. Did we delete the website? Nope. We simply stopped the container.
Bring it back:
sudo docker start my-first-webserverRefresh again. Your website returns.
Beginner discovery: docker start restarts an existing container. docker run creates a new container. That difference explains why repeatedly running hello-world leaves several stopped test containers behind.
Mission 6: Run two Docker web servers side by side
What happens if we use the same Nginx image to launch another server? Do we need another Kali machine? Another installation? Another afternoon of setup?
Nope. Just another container:
sudo docker run -d --name my-second-webserver -p 127.0.0.1:8081:80 nginx:alpineNow open these two addresses in Kali Firefox:
http://localhost:8080— server number onehttp://localhost:8081— server number two
Two web servers, one Kali VM, one reusable Nginx image. Each container is its own running instance. We use different host ports because two services can’t listen on the same host address and port at the same time.
At this point, our little virtual laboratory starts to feel like a real developer playground.
Mission 7: Give the second website its own personality
Both websites look identical. That’s a little boring. Let’s change only the second one.
Copy this command into Kali’s terminal:
echo '<h1>Hello from Docker Server 2!</h1><p>Created for TechEduCareer.</p>' | sudo docker exec -i my-second-webserver tee /usr/share/nginx/html/index.htmlIt sends a small HTML page into the second container and writes it to Nginx’s default website location.
Refresh http://localhost:8081. You should see our custom greeting. Then refresh http://localhost:8080. The first website is unchanged.
Wait—same image, different websites? Exactly! Each container has its own writable layer. Changing a file in one doesn’t automatically change the other.
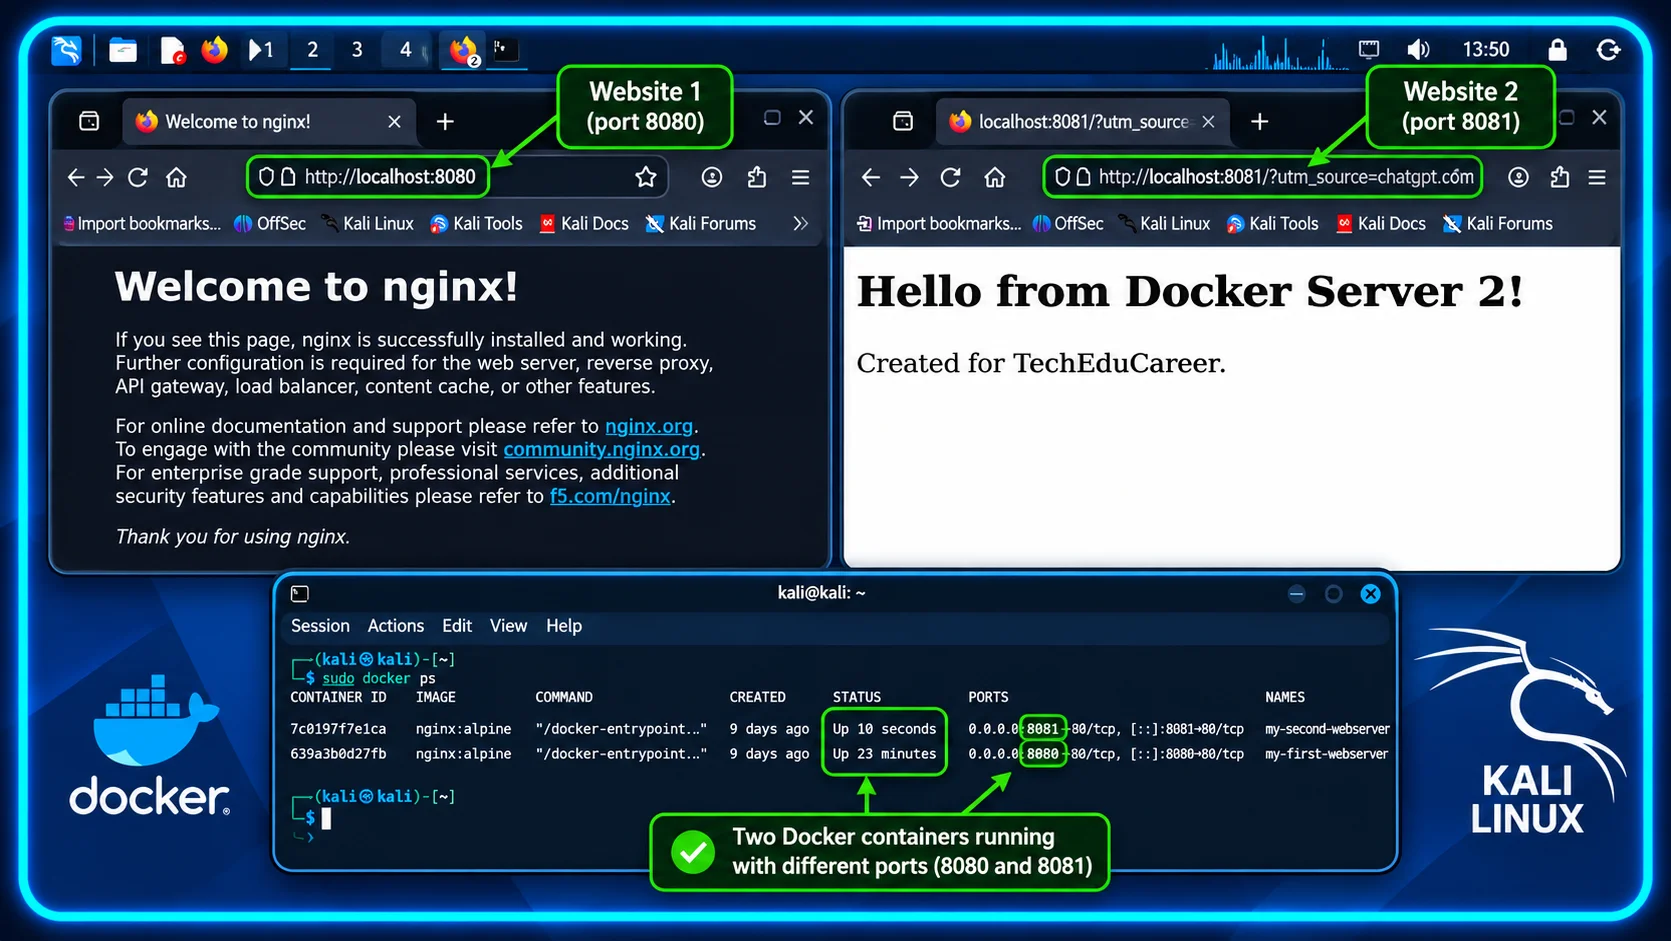
One catch, though: editing files inside a container is great for a demonstration, but not how we’d usually manage an important website. These changes can survive a stop/start, yet disappear if that container is removed and recreated. Persistent storage using bind mounts or volumes is our next lesson—not something we’re pretending to have tested already.
Mission 8: Stop, start, and clean up your containers
We’ve already stopped and restarted our first web server in Mission 5. Before closing the lab, let’s learn the difference between stopping a container and removing it.
See both containers, including any that are stopped:
sudo docker ps -aTo stop our second website without deleting it, run:
sudo docker stop my-second-webserver
sudo docker ps -a
The second container should show Exited, while the first remains Up. This is the state captured in our annotated screenshot below. When you want the second website back, run:
sudo docker start my-second-webserver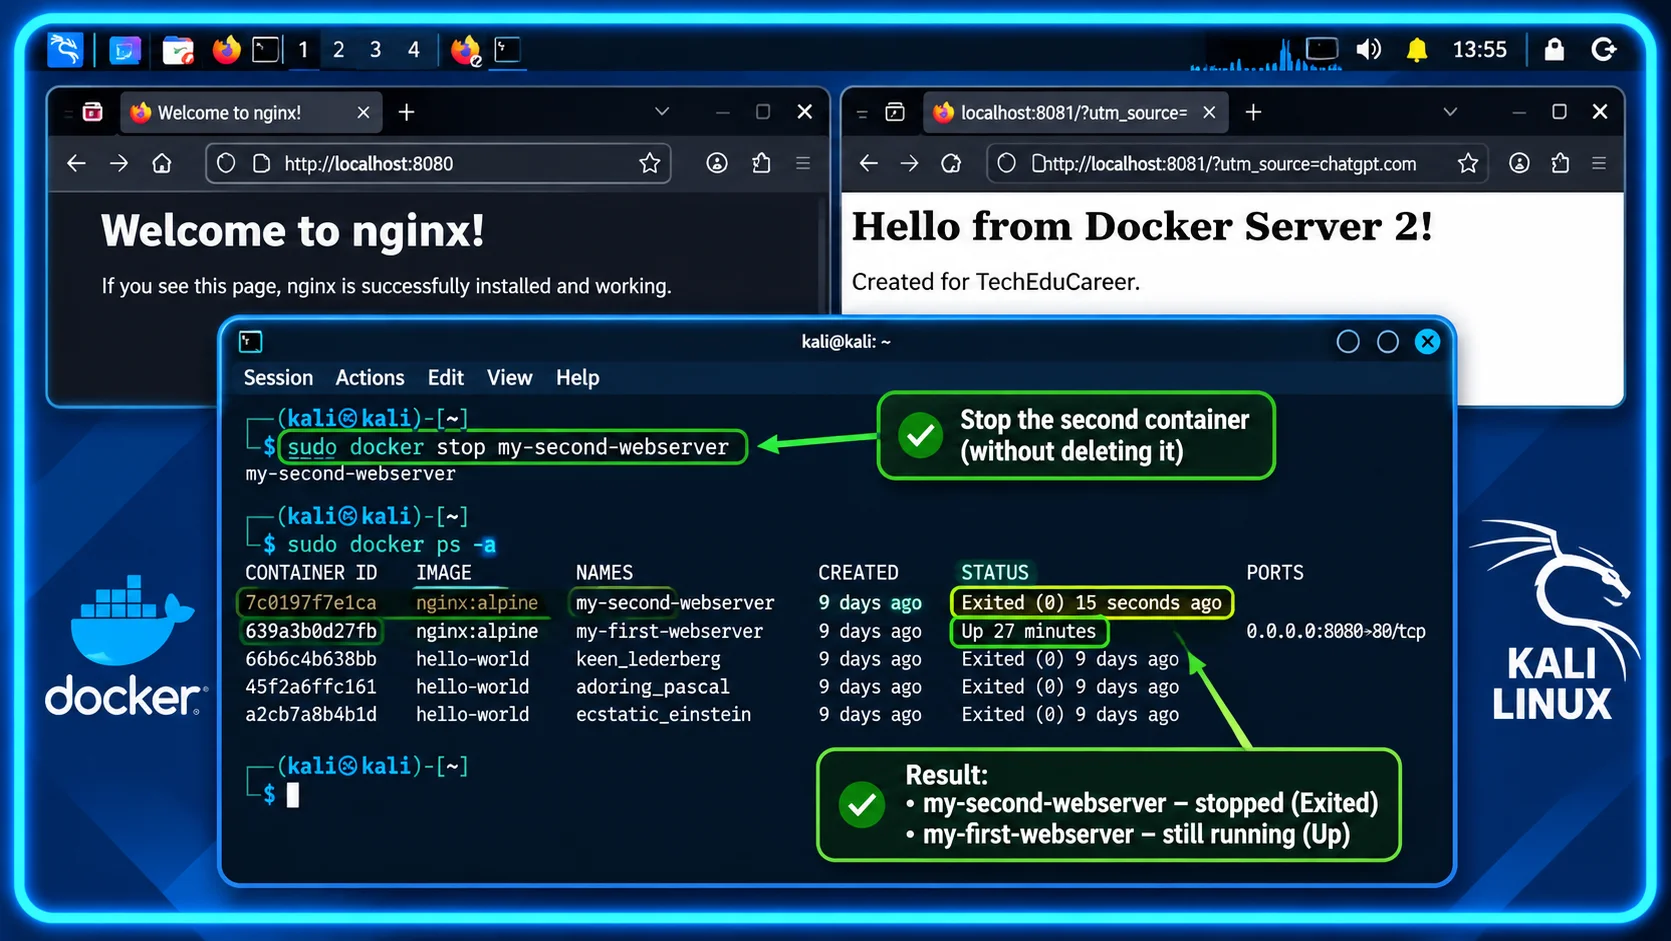
Optional cleanup — only if you’re finished with the customized website: To delete the second container rather than just stop it, first stop it, then remove it. Skip these commands if you want to keep your customized second website for later experiments.
sudo docker stop my-second-webserver
sudo docker rm my-second-webserver
Important: docker rm removes the container, not the downloaded nginx:alpine image. Our custom HTML was written inside that container, so removing it also discards that change. Only do this when you’re finished with the second website. You can create a fresh container later using the docker run command from Mission 6.
To shut down the Kali virtual machine cleanly, run this in Kali’s terminal:
sudo poweroffThis shuts down Kali and its running containers; it does not delete the VM or Docker images. Next time, start the VM in VirtualBox and use docker start for any existing containers you want running again.
Bonus mission: Create a save point before experimenting further
When you’re learning, being able to undo a messy experiment is wonderful. VirtualBox lets you take a snapshot of the VM.
In our experiment, after Docker was working, we shut down Kali:
sudo poweroffThen, in VirtualBox Manager, we created a snapshot named Kali 2026.3 – Docker Working.
To do the same, power off Kali, select the VM, open Snapshots, and create a snapshot with a name you’ll recognize. Remember that a snapshot returns the VM to the state captured at that moment. If you took it before the Nginx missions, those later containers won’t be present after restoring it. Also, snapshots are not a substitute for a proper backup.
Your tiny Docker cheat sheet
| Command | Superpower |
|---|---|
sudo docker run hello-world |
Run a test container |
sudo docker ps |
See what’s running |
sudo docker ps -a |
See all containers, including stopped ones |
sudo docker images |
See downloaded images |
sudo docker stop my-first-webserver |
Stop the first server |
sudo docker start my-first-webserver |
Bring it back |
sudo docker rm my-second-webserver |
Delete the stopped second container (and its internal changes) |
sudo poweroff |
Shut down the Kali VM cleanly |
sudo docker logs my-first-webserver |
Read its logs |
Frequently asked questions
Is Docker a mini virtual machine?
Not quite. Our Kali VM has its own guest operating system. Docker containers share Kali’s Linux kernel while isolating applications. Both are useful, but they solve different problems.
Why Kali? Isn’t it for hackers?
Kali is well known for security testing, but it’s also a Linux environment where you can learn commands and run Docker. If you’re curious about the wider cybersecurity world, our beginner’s explanation of the surface, deep, and dark web explores some common misconceptions. We’re using harmless Nginx images here. Please don’t treat containers as a secure sandbox for running unknown malware.
Why can’t I open localhost:8080 on my main computer?
In this tutorial, localhost means Kali itself, because that’s where Docker runs and where we bound the ports. Reaching the service from your outer computer would require different networking choices, which we’re deliberately saving for another lesson.
What if I shut down Kali? Is everything gone?
No. Docker images, existing containers, and files on Kali’s virtual disk remain unless you remove them. The applications stop while Kali is off. When you start Kali again, you can restart the containers.
Could I build my own app in Docker later?
Absolutely. Today’s lesson uses ready-made images. Later we can create our own image, add persistent files, and learn how containers communicate. That’s where the playground gets really interesting.
Level complete: What did we actually build?
We started with an empty VirtualBox window and ended with two independent web servers running inside Docker on Kali Linux. Along the way, we learned what a virtual machine is, how images differ from containers, how ports connect a container to a browser, and why two containers can behave differently even when they started from the same image.
Best of all, our VirtualBox Kali Linux Docker lab keeps these experiments in a virtual machine rather than turning our everyday computer into a pile of half-finished installations. Remember that a virtual machine is not a guarantee of perfect isolation, so use trusted images and keep the lab updated.
Next adventure? We could make website files survive container replacement, explore Docker networking, or package a tiny application of our own. If building a game sounds more exciting than another web page, explore our beginner’s guide to game development. For now, enjoy the two websites. You’ve earned that victory screen.